Going with the basics here for anyone else who might take a look here...
For Cache Materials "BreakPoints:"
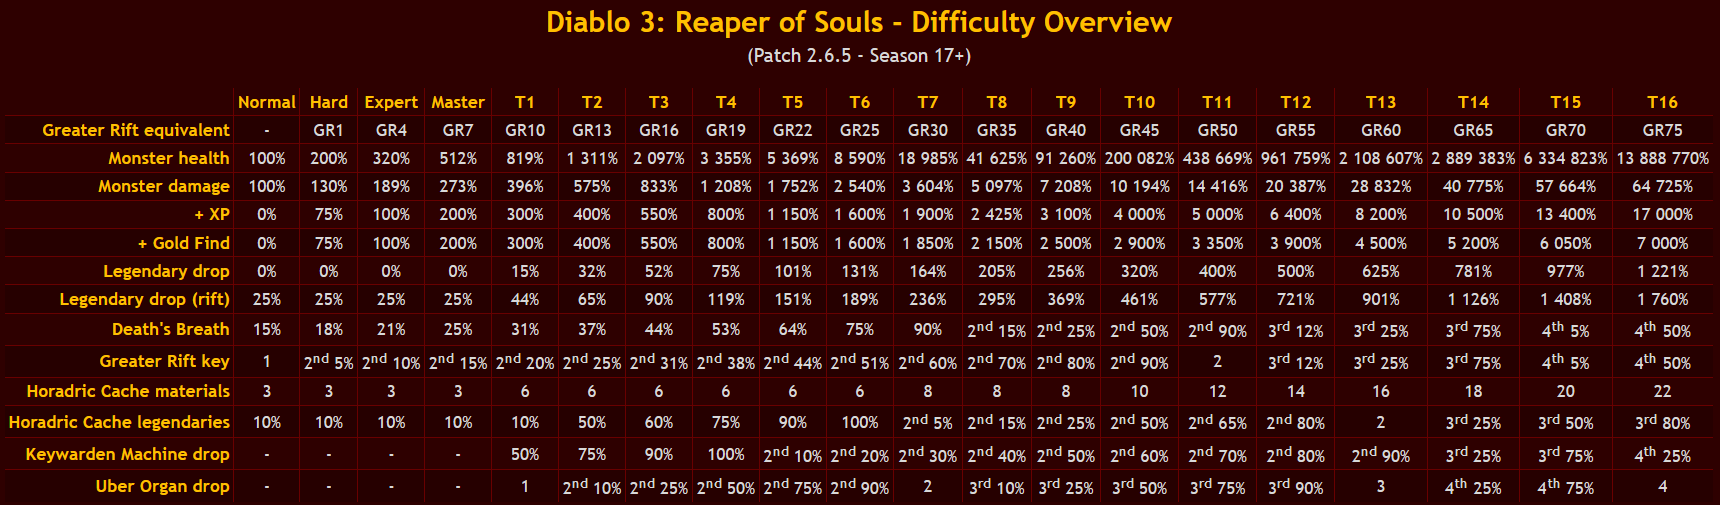
Torment 1 through
Torment 6 give
THREE cache materials.
- You might as well just do Torment 1 if you cannot speed run above Torment 7
Torment 7 through
Torment 9 give
FOUR Cache Materials.
- You might as well just do Torment 7 if you cannot speed run above Torment 10
....etc.
See Chart Below
Speed running would be anything under ~2-3 minutes per bounty...
What is
best is determined based on a ratio of
Cache Materials/Average Clear Time for that Torment level.
Generic example:
[TABLE="class: outer_border, width: 600, align: center"]
[TR]
[TD="align: center"]Torment[/TD]
[TD="align: center"]Average Bounty[/TD]
[TD="align: center"]Number of[/TD]
[TD="align: center"]Average Time per[/TD]
[TD="align: center"]Cache Materials[/TD]
[/TR]
[TR]
[TD="align: center"]Level[/TD]
[TD="align: center"]Time (Seconds)[/TD]
[TD="align: center"]Cache Materials[/TD]
[TD="align: center"]Material (seconds)[/TD]
[TD="align: center"]per hour[/TD]
[/TR]
[TR]
[TD="align: center"]1[/TD]
[TD="align: center"]150[/TD]
[TD="align: center"]3[/TD]
[TD="align: center"]50 seconds[/TD]
[TD="align: center"]72[/TD]
[/TR]
[TR]
[TD="align: center"]2[/TD]
[TD="align: center"]150[/TD]
[TD="align: center"]3[/TD]
[TD="align: center"]50[/TD]
[TD="align: center"]72[/TD]
[/TR]
[TR]
[TD="align: center"]3[/TD]
[TD="align: center"]150[/TD]
[TD="align: center"]3[/TD]
[TD="align: center"]50[/TD]
[TD="align: center"]72[/TD]
[/TR]
[TR]
[TD="align: center"]4[/TD]
[TD="align: center"]150[/TD]
[TD="align: center"]3[/TD]
[TD="align: center"]50[/TD]
[TD="align: center"]72[/TD]
[/TR]
[TR]
[TD="align: center"]5[/TD]
[TD="align: center"]160[/TD]
[TD="align: center"]3[/TD]
[TD="align: center"]53.3[/TD]
[TD="align: center"]67[/TD]
[/TR]
[TR]
[TD="align: center"]6[/TD]
[TD="align: center"]170[/TD]
[TD="align: center"]3[/TD]
[TD="align: center"]56[/TD]
[TD="align: center"]64[/TD]
[/TR]
[TR]
[TD="align: center"]7[/TD]
[TD="align: center"]190[/TD]
[TD="align: center"]4[/TD]
[TD="align: center"]47.5[/TD]
[TD="align: center"]75[/TD]
[/TR]
[TR]
[TD="align: center"]8[/TD]
[TD="align: center"]220[/TD]
[TD="align: center"]4[/TD]
[TD="align: center"]55[/TD]
[TD="align: center"]65[/TD]
[/TR]
[TR]
[TD="align: center"]9[/TD]
[TD="align: center"]260[/TD]
[TD="align: center"]4[/TD]
[TD="align: center"]65[/TD]
[TD="align: center"]55[/TD]
[/TR]
[TR]
[TD="align: center"]10[/TD]
[TD="align: center"]320[/TD]
[TD="align: center"]5[/TD]
[TD="align: center"]64[/TD]
[TD="align: center"]56[/TD]
[/TR]
[TR]
[TD="align: center"]11[/TD]
[TD="align: center"]400[/TD]
[TD="align: center"]6[/TD]
[TD="align: center"]67[/TD]
[TD="align: center"]53[/TD]
[/TR]
[/TABLE]
In this example, you can see that Torment 7 is overall the best because it averages 75 Materials an hour.
You can implement some math skills if you like.
- Run your fastest T1 bounties with max speed gear (avarice band, warzechians, boon of hoarder, etc, etc) for a few hours.
- Figure out how many seconds are required for each bounty.
- Take the number of seconds per run and divide it by the 3 cache materials you get.
- This is your "seconds per cache" average.
- For every additional Cache material you can get by increasing Torment, you cannot add more than this amount of time!
Let's say your clear time for T1 is 2 minutes. That means 120 seconds / 3 cache materials = 40 seconds/material.
[TABLE="class: outer_border, width: 500, align: center"]
[TR]
[TD="align: center"]difficulty[/TD]
[TD="align: center"]materials[/TD]
[TD="align: center"]T1 Clear time[/TD]
[TD="align: center"]Efficient Bounty Time
Compared to T1 Time[/TD]
[/TR]
[TR]
[TD="align: center"]T1[/TD]
[TD="align: center"]3[/TD]
[TD="align: center"]40[/TD]
[TD="align: center"]120[/TD]
[/TR]
[TR]
[TD="align: center"]T7[/TD]
[TD="align: center"]4[/TD]
[TD="align: center"]40[/TD]
[TD="align: center"]160[/TD]
[/TR]
[TR]
[TD="align: center"]T10[/TD]
[TD="align: center"]5[/TD]
[TD="align: center"]40[/TD]
[TD="align: center"]200[/TD]
[/TR]
[TR]
[TD="align: center"]T11[/TD]
[TD="align: center"]6[/TD]
[TD="align: center"]40[/TD]
[TD="align: center"]240[/TD]
[/TR]
[TR]
[TD="align: center"]T12[/TD]
[TD="align: center"]7[/TD]
[TD="align: center"]40[/TD]
[TD="align: center"]280[/TD]
[/TR]
[TR]
[TD="align: center"]T13[/TD]
[TD="align: center"]8[/TD]
[TD="align: center"]40[/TD]
[TD="align: center"]320[/TD]
[/TR]
[/TABLE]
If your T11 clear time is less than 240 seconds, it's better than going Torment 1.
If your clear time for T13 is less that 320 seconds per bounty, it's more efficient than T1.
etc.