


This guide will show developers how to setup a project for Exilebuddy.
Before you start, you need Visual Studio 2017 Community Edition (or higher). It's free with a Microsoft account. Visual Studio 2015 and below are not supported by us anymore, so it's best to stick with the current VS version to avoid issues with not being able to access the same libraries.
When installing Visual Studio 2017, you need to make sure to install the .Net framework bundle. The new main option for .Net is called Universal, which we do not support.
Part 1
1. Create a new Project in Visual Studio.

2. Create a "Class Library (.NET Framework)" that targets ".Net Framework 4.6.1". Failure to use these exact settings will result in your project not working correctly. If you do not see the correct options, you most likely did not install the .Net framework bundle.

NOTE: I did not change my Solution name, but if you plan on having multiple projects, you can. Ideally, it's best to use separate names for the Solution and Project, to avoid issues with duplicate names, but this is just an example.
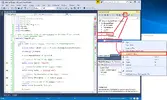
3. With a new project made, the first thing that needs to be done is to change the project configuration to 32-bit. Click on "Build" and then go to "Configuration Manager".

4. Since this is a new solution/project, we need to add the x86 platform. Expand the "Active solution platform" and choose "< New... >".

5. Now, we can make the new build platform. Change the "Type or select the new platform" drop down to "x86". Leave the second entry as "Any CPU". Make sure the checkbox is marked for "Create new project platform". Once again, since this is a new solution/project, we do not already have the x86 platform settings created, and need to create it.
If we were adding another project to the solution, we would not need to have the checkbox marked, since the platform already existed, and we could just add the x86 platform to the new project.

6. Click "OK" and "Close". At this point, we can verify our settings are correct, as we have to have x86 generated content to work in Exilebuddy. Right click on the project in the Solution Explorer and go to Properties. Change the tab to "Build" to verify settings.
In this example, I only am doing Debug, but you'd want to make sure Release was set to x86 as well if you were going to deploy content from a Release build instead.

7. At this point, it's also good to verify that the .Net 4.6.1 library is being used. If it is not, references to Exilebuddy will fail. Change the tab to "Application".

8. With those two sets of settings confirmed, it is time to start adding references to the project. Right click on the References entry in the Solution Explorer for the project and choose "Add References...".

9. First, we will add Exilebuddy specific references. Expand the "Browse" tab and click on the "Browse" button.

10. At minimal, choose: the Exilebuddy assembly, GreyMagic.dll, log4net.dll, Newtonsoft.Json.dll, and Udis86Net.dll. Depending on if you need other assemblies based on your project, you can add them the same way later. For this example, we'll just need these basic files.

Before you start, you need Visual Studio 2017 Community Edition (or higher). It's free with a Microsoft account. Visual Studio 2015 and below are not supported by us anymore, so it's best to stick with the current VS version to avoid issues with not being able to access the same libraries.
When installing Visual Studio 2017, you need to make sure to install the .Net framework bundle. The new main option for .Net is called Universal, which we do not support.
Part 1
1. Create a new Project in Visual Studio.
2. Create a "Class Library (.NET Framework)" that targets ".Net Framework 4.6.1". Failure to use these exact settings will result in your project not working correctly. If you do not see the correct options, you most likely did not install the .Net framework bundle.
NOTE: I did not change my Solution name, but if you plan on having multiple projects, you can. Ideally, it's best to use separate names for the Solution and Project, to avoid issues with duplicate names, but this is just an example.
3. With a new project made, the first thing that needs to be done is to change the project configuration to 32-bit. Click on "Build" and then go to "Configuration Manager".
4. Since this is a new solution/project, we need to add the x86 platform. Expand the "Active solution platform" and choose "< New... >".
5. Now, we can make the new build platform. Change the "Type or select the new platform" drop down to "x86". Leave the second entry as "Any CPU". Make sure the checkbox is marked for "Create new project platform". Once again, since this is a new solution/project, we do not already have the x86 platform settings created, and need to create it.
If we were adding another project to the solution, we would not need to have the checkbox marked, since the platform already existed, and we could just add the x86 platform to the new project.
6. Click "OK" and "Close". At this point, we can verify our settings are correct, as we have to have x86 generated content to work in Exilebuddy. Right click on the project in the Solution Explorer and go to Properties. Change the tab to "Build" to verify settings.
In this example, I only am doing Debug, but you'd want to make sure Release was set to x86 as well if you were going to deploy content from a Release build instead.
7. At this point, it's also good to verify that the .Net 4.6.1 library is being used. If it is not, references to Exilebuddy will fail. Change the tab to "Application".
8. With those two sets of settings confirmed, it is time to start adding references to the project. Right click on the References entry in the Solution Explorer for the project and choose "Add References...".
9. First, we will add Exilebuddy specific references. Expand the "Browse" tab and click on the "Browse" button.
10. At minimal, choose: the Exilebuddy assembly, GreyMagic.dll, log4net.dll, Newtonsoft.Json.dll, and Udis86Net.dll. Depending on if you need other assemblies based on your project, you can add them the same way later. For this example, we'll just need these basic files.
Last edited:


")


