fpsware
Community Developer
- Joined
- Jan 15, 2010
- Messages
- 5,287
- Reaction score
- 133
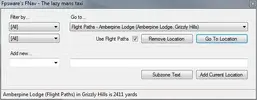
What is FNav?
FNav is simply a "Go To" type of plug-in. Select a predefined location from the database (many have already been added), click the magic button, and let HB take you there fully unattended.
How does it differ from similar "go to" plug-ins?
The end result is exactly the same; HB moves your character to the selected destination. FNav differs in that you add locations to a database and select your destination from a drop-down list. Zone and category filtering options enable you to quickly find and select your destination from the database.
I can run there myself why do I need plug-in?
If you're like me and have multiple bots running it can take a lot of time running around from location to location; class trainers, profession trainers, auction house, moving to the next profile zone etc. FNav eliminates the tedious hands-on travelling.
But I can do all of that with HB "go to" profiles, why do I need a plug-in?
I too had literally dozens upon dozens of "go to" profiles but it became messy and unorganised. Not to mention time-consuming looking for exactly the right profile. With FNav, in only one click I can find every flight point, class trainer, profession trainer, inn or anything else I want.
Okay, I'm sold how do I get started?
Read on and all shall be answered.
Installation Instructions
FNav needs to be installed in the plug-ins folder. ...HB\Plugins\FNav The folder must be called FNav and all files must be located inside of it.
How To Use FNav
Usage is extremely straightforward and intuitive requiring only one or 2 clicks to find exactly what you need. once you have selected your location from the "go to" drop-down you simply click the "Go To Location" button. It couldn't be simpler.
The Idiots Guide To FNav
Now, I'm not saying YOU are an idiot but we all know they walk amongst us. This is a complete guide on how to use all 10 buttons, checkboxes & drop downs on the FNav UI.
Step 1 - How to show the FNav UI.
In HB, on the plug-ins tab you will find a list of plug-ins currently installed. In this list you will see "FNav - the lazy mans taxi", of course, this assumes you have installed correctly. Select it from the list, ensure there is a tick in the "Enable" checkbox, finally, click the settings button. You should now see the FNav UI.
Step 2 ? What does it all mean?
For the intellectually challenged - again, I'm not saying that's YOU - I have included a detailed explanation of everything on the UI.
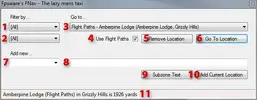
1. Category filter. Only want to see all locations from a specific category? Select it from the drop-down. It couldn't be simpler.
2. Zone filter. Only want to see locations in a specific zone? Select it from the drop-down.
3. The complete list of available locations (depending on your filters of course).
4. The flight path setting toggles the same setting within HB.
5. Remove the currently selected location from the database. Because some of you may not know what you're doing, you will be asked to confirm this action the 4 why it will allow you to actually use the item.
6. The magic button. Left click this button and HB will take you to your destination. Right click this and FNav will select the closest location from the list. Eg... to find the closest mailbox.
7. The category to be used when adding a new location. Either select an option from the drop-down list or type your own.
8. The name (or description) you want to give to your location.
9. Queries your location for the subzone name and puts the text in the above (8) text box.
10. Adds your new entry to the database will stop
11. The status bar contains the full description and distance of the selected (3) location.
I'm so confused, can you just show me how to add a new location?
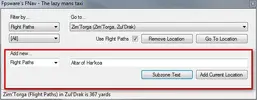
*sigh* Sure. First, go to the location you want to add to the database. Yes, you have to physically go there. Select a category for this location, either select an item from the list or type your own. Now type the name of this location. Personally, I use the text from the sub zone text button. Unless I'm adding a class or profession trainer then I use a name such as Druid, Warlock, Herbalism, Mining etc. You will see why when you look at the existing locations in the database.
And here is a neat picture so you can see how it's all done. If you like you can even colour it in. I have some crayons on my desk you need them.
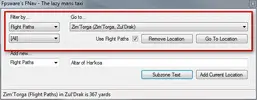
I think I understand this, but, can you give me a picture on how to select location?
Sure.
Other things you may need to know but were afraid to ask.
* Horde and Alliance locations are filtered automatically. As an Alliance character will not see any entries for Horde and vice versa.
* Continent locations are filtered automatically. You will not see Outland locations if you are in Northrend for example.
* The zone filter is dynamically updated. It will only show zones of items that have a location. The category filter is not dynamically updated.
* There is a heavy bias on Alliance locations, this is simply because I did most of the testing on an Alliance character.
* Right click the Go To Location button to select the closest location. Eg, to find the closest mailbox.
* Navigation is controlled by HB. Absolutely no navigation is performed by this plug-in. This plug-in simply creates a small go to profile and loads it into HB, it is not responsible for any movement or navigation. Again, just for those who don't like red text, here is something in mauve; absolutely no navigation or movement is performed by this plug-in. All navigation and movement is performed by HB.
Known issues and bugs
* Sometimes it does not display anything in the location drop-down. Close and reopen FNav.
* The user.
* Adding a new entry with a blank location. I have put some checks in place to confirm the location is not <0,0,0> before adding re-entry to the database.
* Sometimes there is no subzone text. This is either WoW or HB, not the plug-in.
Attachments
Last edited:
